Thursday, 30 April 2020

Natural Language Processing - Part 2


Last time we have seen some interesting libraries and applications of NLP (click here to go to part-1). So let's extend that here 
and dive straight into building a step by step NLP pipeline: 
NOTE : I have attached the link to my IPython Notebook here and request you to have a look at it simultaneously while reading for better understanding: 👇https://github.com/ApoorvTyagi/NLP_Activities/blob/master/NLP-Starter.ipynb


1. Sentence Tokenization

Suppose we are given a paragraph, the only way to understand it is to first understand all the sentences in it and to understand a sentence we need to understand each word in it, this is exactly what Sentence Tokenization means. In NLP we can use NLTK or SpaCy for tokenization, we can also use deep learning framework Keras for doing tokenization.
It is used for spelling correction, processing searches, identifying parts of speech, document classification etc.

2. Stopword Removal

In a sentence there are often words like 'is', 'an', 'a', 'the', 'in' etc. which are unnecessary for us as they rarely adds any value to the information retrieval of a sentence, so it's better remove these words and save our computation. NLTK and many other libraries like SpaCy and Gensim supports stopword removal.
To remove stop word from a sentence you have to first tokenize it and remove the word if it exist in the list of stopwords provided in the corpus module of the library.


3. Stemming

Stemming as the word suggest is the process of slicing out the affixes from the end and the beginning of the word in order to get the root word.
Most words tend to become a completely new word when we attach a affix to it for example,
Play, Played, Plays, Playing; all these word are different form of the same word 'Play'. So in order to compare the words directly we first apply stemming to them.
NLTK provides two types of stemmer: Porter stemmer and snowball stemmer, in our implementation we have used porter stemmer.


4. Lemmatization

Things which we can't achieve with stemming can be done using lemmatization. This is the process of figuring out the most basic form of each word in the sentence.For example, verbs in past tense are changed into present (e.g. “went” is changed to “go”) and synonyms are unified (e.g. “best” is changed to “good”), hence standardizing words with similar meaning to their root. Lemmatization also takes into consideration the context of the word in order to solve other problems like disambiguation, which means it can discriminate between identical words that have different meanings depending on the specific context.


5. Similarity

Similarity is the process of comparing two sentences at a time and determining how similar the two are. We do this using the Vector Space Model.
The idea is to treat each sentence as vector. The coordinates of the vector are obtained by taking the term frequencies, as each term represents a dimension.
Two terms would mean 2-dimensions (X and Y).
Three terms would mean 3-dimensions (X, Y and Z) and so on.
So for example let's say we have 2 sentences (after tokenizing, stemming and stopword removal and lemmatization) -
  • Sachin play cricket
  • Sachin study
Now, the terms here are (Sachin, play, cricket, study). Let's sort them just to normalize them.
The terms after sorting, are (cricket, play, Sachin, study).
Now we can plot the two sentences in a 4-dimensional graph, by taking the coordinates from the term frequencies.
Meaning, sentence 1 "Sachin play Cricket" will have the coordinates (1, 1, 1, 0)
And sentence 2 "Sachin study" will have the coordinates (1, 0, 0, 1)
We can calculate similarity using:

(a) Euclidean Similarity


Given two points in an N-dimensional space, the distance between them is the square root of the sum of the difference of their squares.


In Euclidean similarity the smaller the value, the better as the two points must be closer.

(b) Cosine Similarity


In cosine similarity we just take the dot product to see how similar the two vectors are, as the dot product produces a representation of one vector on the other.
Here we just multiply the term frequency


In the case of Cosine Similarity, the larger the value, the better as the cosine function is decreasing, plus the larger the value the closer the two points must be.


6. Naive Bayes Classifier

Naive Bayes is a statistical multiclass classification technique based on Bayes Theorem. It is one of the simplest supervised learning algorithms. Naive Bayes classifier is the fast, accurate and reliable algorithm. Naive Bayes classifiers have high accuracy and speed on large datasets.
It works by comparing the probability that a document D may belong to a class Cx based on the likelihood of class Cx being the correct class, and the likelihood that the terms in D belong to Cx also it does not factor in inter-term relationships, as it assumes each term uniquely and individually contributes to the probability of the document's final class.

7. Hierarchical Clustering

Clustering is a way to identify documents similar to each other. Its usually an unsupervised learning problem, while classification is a supervised learning problem.
Basically, in an unsupervised problem, you don't tell the machine what its looking for - it finds that out itself. In a supervised problem, you tell the machine what to find, given what information.
Clustering is grouping up some data points and claiming that these data points are similar to each other under certain parameters.
The idea of Hierarchical clustering is simple, we build a "dendrogram" which is basically just a tree that describes the order of clustering based on the following chosen heuristic.
  • Single Linkage
  • Complete Linkage

We in our case will use single linkage and here's the algorithm for this:
  • Find the distance between every pair of points [takes O(n^2)]
  • Then, join the pair whose distance is smallest - this form the first cluster
  • Then recalculate the distance between all pairs, except whenever you're considering a cluster's distance with a point, you take the smallest value among the distance between the external point and all internal points of the cluster.

Happy NLPing 😉

Monday, 13 April 2020

Azure Service Bus Queue

Overview of Azure Service Bus - Whizlabs Blog

Lately my work is being revolved around Queues as we have a requirement where everyday we need to schedule a task at a particular time of the day. There is a way in spring boot to do this via @Schedule annotation along with cron expression but we wanted something to work on multi-node environment to ensure high availability. So we decided to use azure's service bus queue.
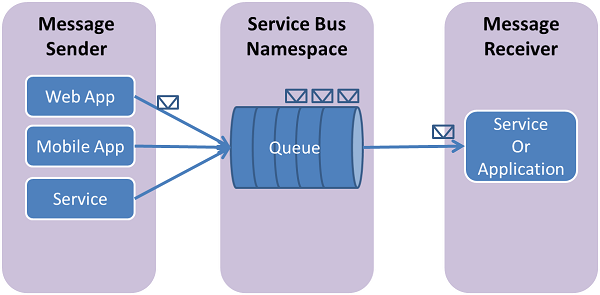
When using queues, components of a distributed application do not communicate directly with each other; instead they exchange messages via a queue, which acts as an intermediary (broker). A message producer (sender) hands off a message to the queue and then continues its processing. Asynchronously, a message consumer (receiver) pulls the message from the queue and processes it. The producer does not have to wait for a reply from the consumer in order to continue to process and send further messages. Queues offer First In, First Out (FIFO) message delivery to one or more competing consumers. That is, messages are typically received and processed by the receivers in the order in which they were added to the queue, and each message is received and processed by only one message consumer.
Service Bus queues are a general-purpose technology that can be used for a wide variety of scenarios:
  • Communication between web and worker roles in a multi-tier Azure application.
  • Communication between on-premises apps and Azure-hosted apps in a hybrid solution.
  • Communication between components of a distributed application running on-premises in different organizations or departments of an organization.

QueueConcepts

Using queues enables you to scale your applications more easily, and enable more resiliency to your architecture.
Service Bus queues support a maximum message size of 256 KB. The header, which includes the standard and custom application properties, can have a maximum size of 64 KB. There is no limit on the number of messages held in a queue but there is a cap on the total size of the messages held by a queue. This queue size is defined at creation time, with an upper limit of 5 GB.


Send Messages To a Queue:

To send messages to a Service Bus Queue, your application instantiates a QueueClient object and sends messages asynchronously. The following code shows how to send a message:

@Component
public class QueueSendService {
   QueueClient queueClient=new QueueClient(new ConnectionStringBuilder(
"ConnectionString","yourQueueName"),ReceiveMode.PEEKLOCK);
    private static final Logger logger = LoggerFactory.getLogger(QueueSendService.class);
    public QueueSendService() throws ServiceBusException, InterruptedException {
    }
    public void addToQueue() {
        logger.info("Sending Data to queue....");
        final String msg="This message will be enqueued after 60 seconds....";
        final Message message=new Message(msg.getBytes(StandardCharsets.UTF_8));
        try {
            queueClient.scheduleMessage(message,
Clock.systemUTC().instant().plusSeconds(60));
        }
        catch (Exception ignored){
        }
        logger.info("Data Sent...");
    }
}


Receive Messages From a Queue:

The primary way to receive messages from a queue is to use a ServiceBusContract object. Received messages can work in two different modes: ReceiveAndDelete and PeekLock.
When using the ReceiveAndDelete mode, receive is a single-shot operation - that is, when Service Bus receives a read request for a message in a queue, it marks the message as being consumed and returns it to the application. ReceiveAndDelete mode (which is the default mode) is the simplest model and works best for scenarios in which an application can tolerate not processing a message in the event of a failure. To understand this, consider a scenario in which the consumer issues the receive request and then crashes before processing it. Because Service Bus has marked the message as being consumed, then when the application restarts and begins consuming messages again, it has missed the message that was consumed prior to the crash.
In PeekLock mode, receive becomes a two stage operation, which makes it possible to support applications that cannot tolerate missing messages. When Service Bus receives a request, it finds the next message to be consumed, locks it to prevent other consumers receiving it, and then returns it to the application. After the application finishes processing the message (or stores it reliably for future processing), it completes the second stage of the receive process by calling complete() on the received message. When Service Bus sees the complete() call, it marks the message as being consumed and remove it from the queue.
The following example demonstrates how messages can be received and processed using PeekLock mode:


public class ListenerService {
    private final Logger logger = LoggerFactory.getLogger(ListenerService.class);
    ListenerService() throws Exception {
        IMessageReceiver receiver = ClientFactory.
createMessageReceiverFromConnectionStringBuilder(
                new ConnectionStringBuilder(yourConnectionString, yourQueueName),
 ReceiveMode.PEEKLOCK);
        this.receiveMessagesAsync(receiver);
    }
    void receiveMessagesAsync(IMessageReceiver receiver) {
        CompletableFuture currentTask = new CompletableFuture();
        try {
            CompletableFuture.runAsync(() -> {
                while (!currentTask.isCancelled()) {
                    try {
                        IMessage message = receiver.receive(Duration.ofSeconds(60));
                        if (message != null) {
                            logger.info("Recieved a Message from queue");
                            receiver.completeAsync(message.getLockToken());
                        }
                    } catch (Exception e) {
                        currentTask.completeExceptionally(e);
                    }
                }
                currentTask.complete(null);
            });
        } catch (Exception e) {
            currentTask.completeExceptionally(e);
        }
    }
}

The only maven dependency that you need to add to your pom.xml is:
        <dependency>
            <groupId>com.microsoft.azure</groupId>
            <artifactId>azure-servicebus</artifactId>
            <version>1.2.8</version>
        </dependency>

A key benefit of using queues is to achieve "temporal decoupling" of application components. In other words, the producers (senders) and consumers (receivers) do not have to be sending and receiving messages at the same time, because messages are stored durably in the queue. Furthermore, the producer does not have to wait for a reply from the consumer in order to continue to process and send messages.
A related benefit is "load leveling," which enables producers and consumers to send and receive messages at different rates. In many applications, the system load varies over time; however, the processing time required for each unit of work is typically constant. As the load increases, more worker processes can be added to read from the queue. Each message is processed by only one of the worker processes. Furthermore, this pull-based load balancing allows for optimum use of the worker computers even if the worker computers differ with regard to processing power, as they pull messages at their own maximum rate. This is often termed the "competing consumer" pattern.
Using queues to intermediate between message producers and consumers provides an inherent loose coupling between the components. Because producers and consumers are not aware of each other, a consumer can be upgraded without having any effect on the producer.